openHASP touch display build
openHASP running in a 3D printed case
I discovered openHASP while I was searching for projects integrating touch interfaces with Home Assistant.
It's easy to wire up a cheap ESP microcontroller board and TFT display module, and by loading this opensource firmware you can turn it into a network connected touch control panel and control devices and display things.
When I bumped into a nice 2.8" TFT Desktop stand enclosure on thingiverse, I remembered I had an unused 2.8" ILI9341 display with resistive touch layer from a previous project.
Connecting the dots... I had all the necessary parts in my workshop, this would make a nice project to make over a weekend evening.
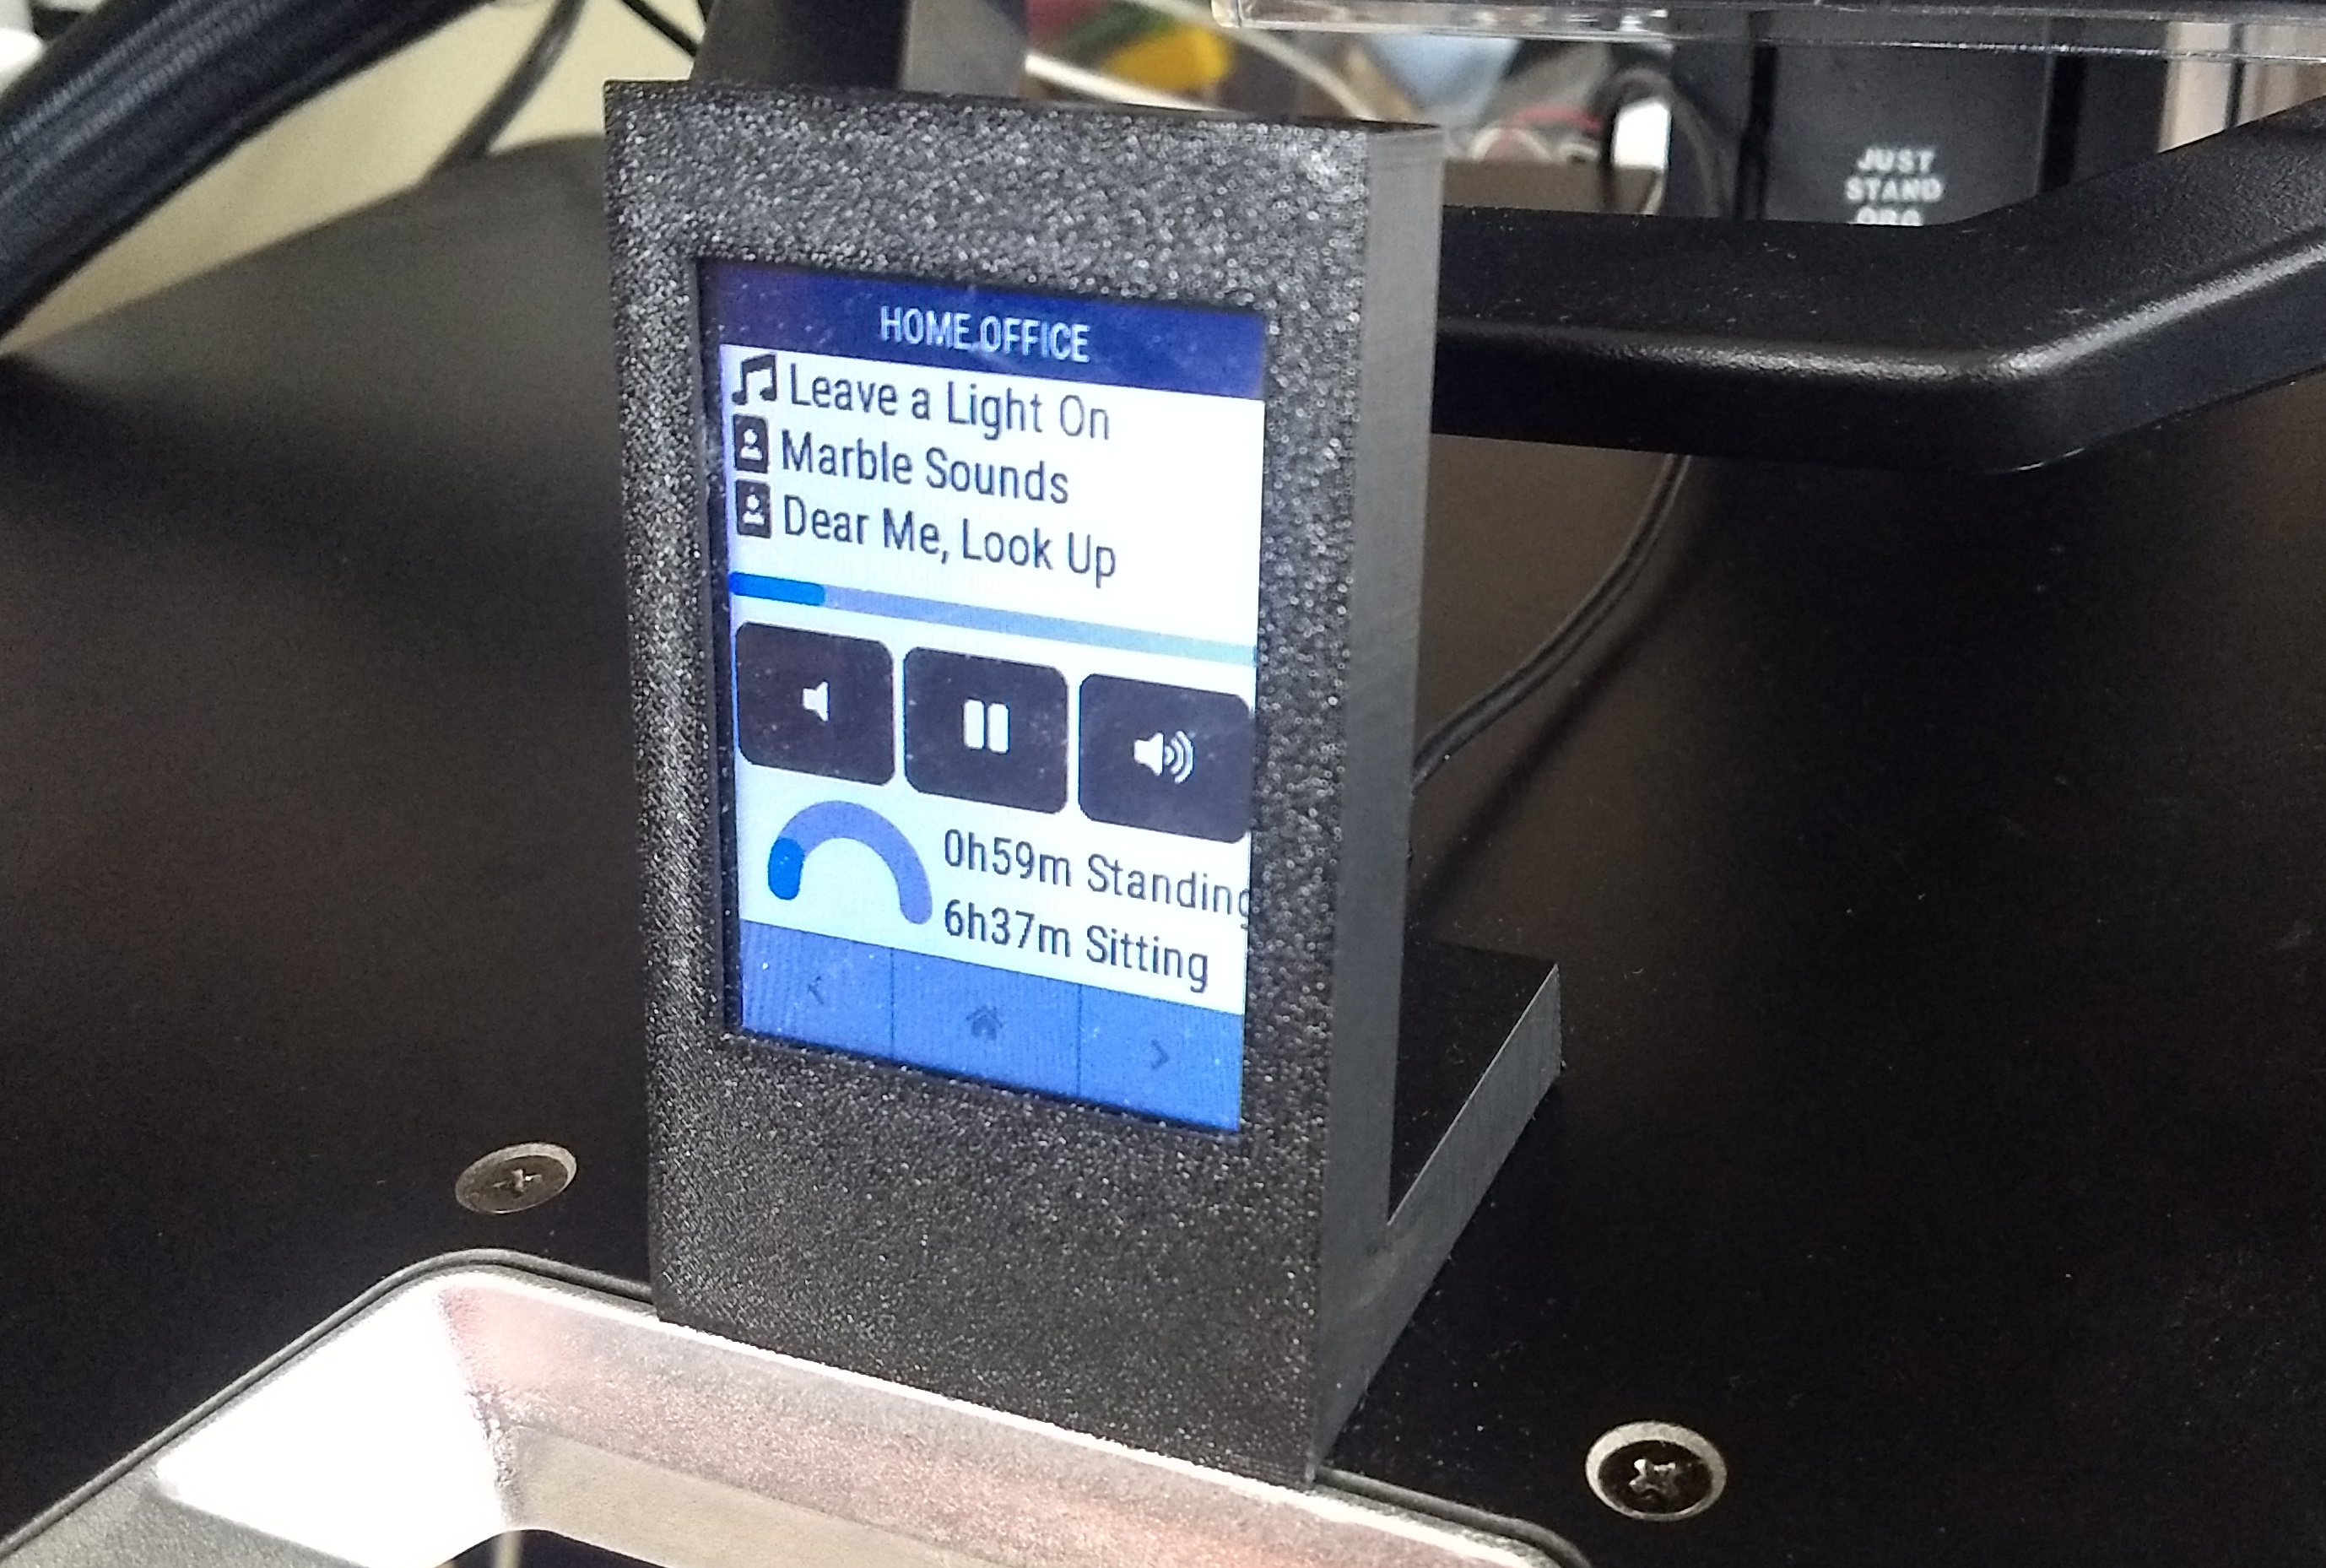
OpenHASP Features
The main job of openHASP is to display a user interface on a TFT display, and expose it over MQTT, the serial port or a socket.
This makes it ideal to control devices over WiFi and display state and status.
The interface is based on the concept of pages, each is screen-sized, and can be called onto the screen. Page 0 is special and can be used as an overlay with e.g. time and/or navigation tabs.
The pages are defined using lines of JSON, and pushed over MQTT or uploaded over the built-in HTTP web server.
The state of the widgets can be modified over MQTT topics, and when a user operates the touch interface, MQTT messages are published.
Bill of materials
I used a TTGO Mini32 module, which can be found on aliexpress for about 7 Euro including shipping. The TFT would be something like "240x320 2.8" SPI TFT LCD Touch Panel Module ILI9341 with Touch Pen", currently available for about 10 Euro including shipping.
Hardware
I kicked things off by printing the enclosure, since this requires the least amount of effort and provides tangible motivation to solve any roadblocks I would encounter.
Downloading a file, slicing it and printing it on m Prusa Mk3s is routine to me, and a few hours later, I had something that fitted the TFT display perfectly. Thank you for sharing your design, smily77!
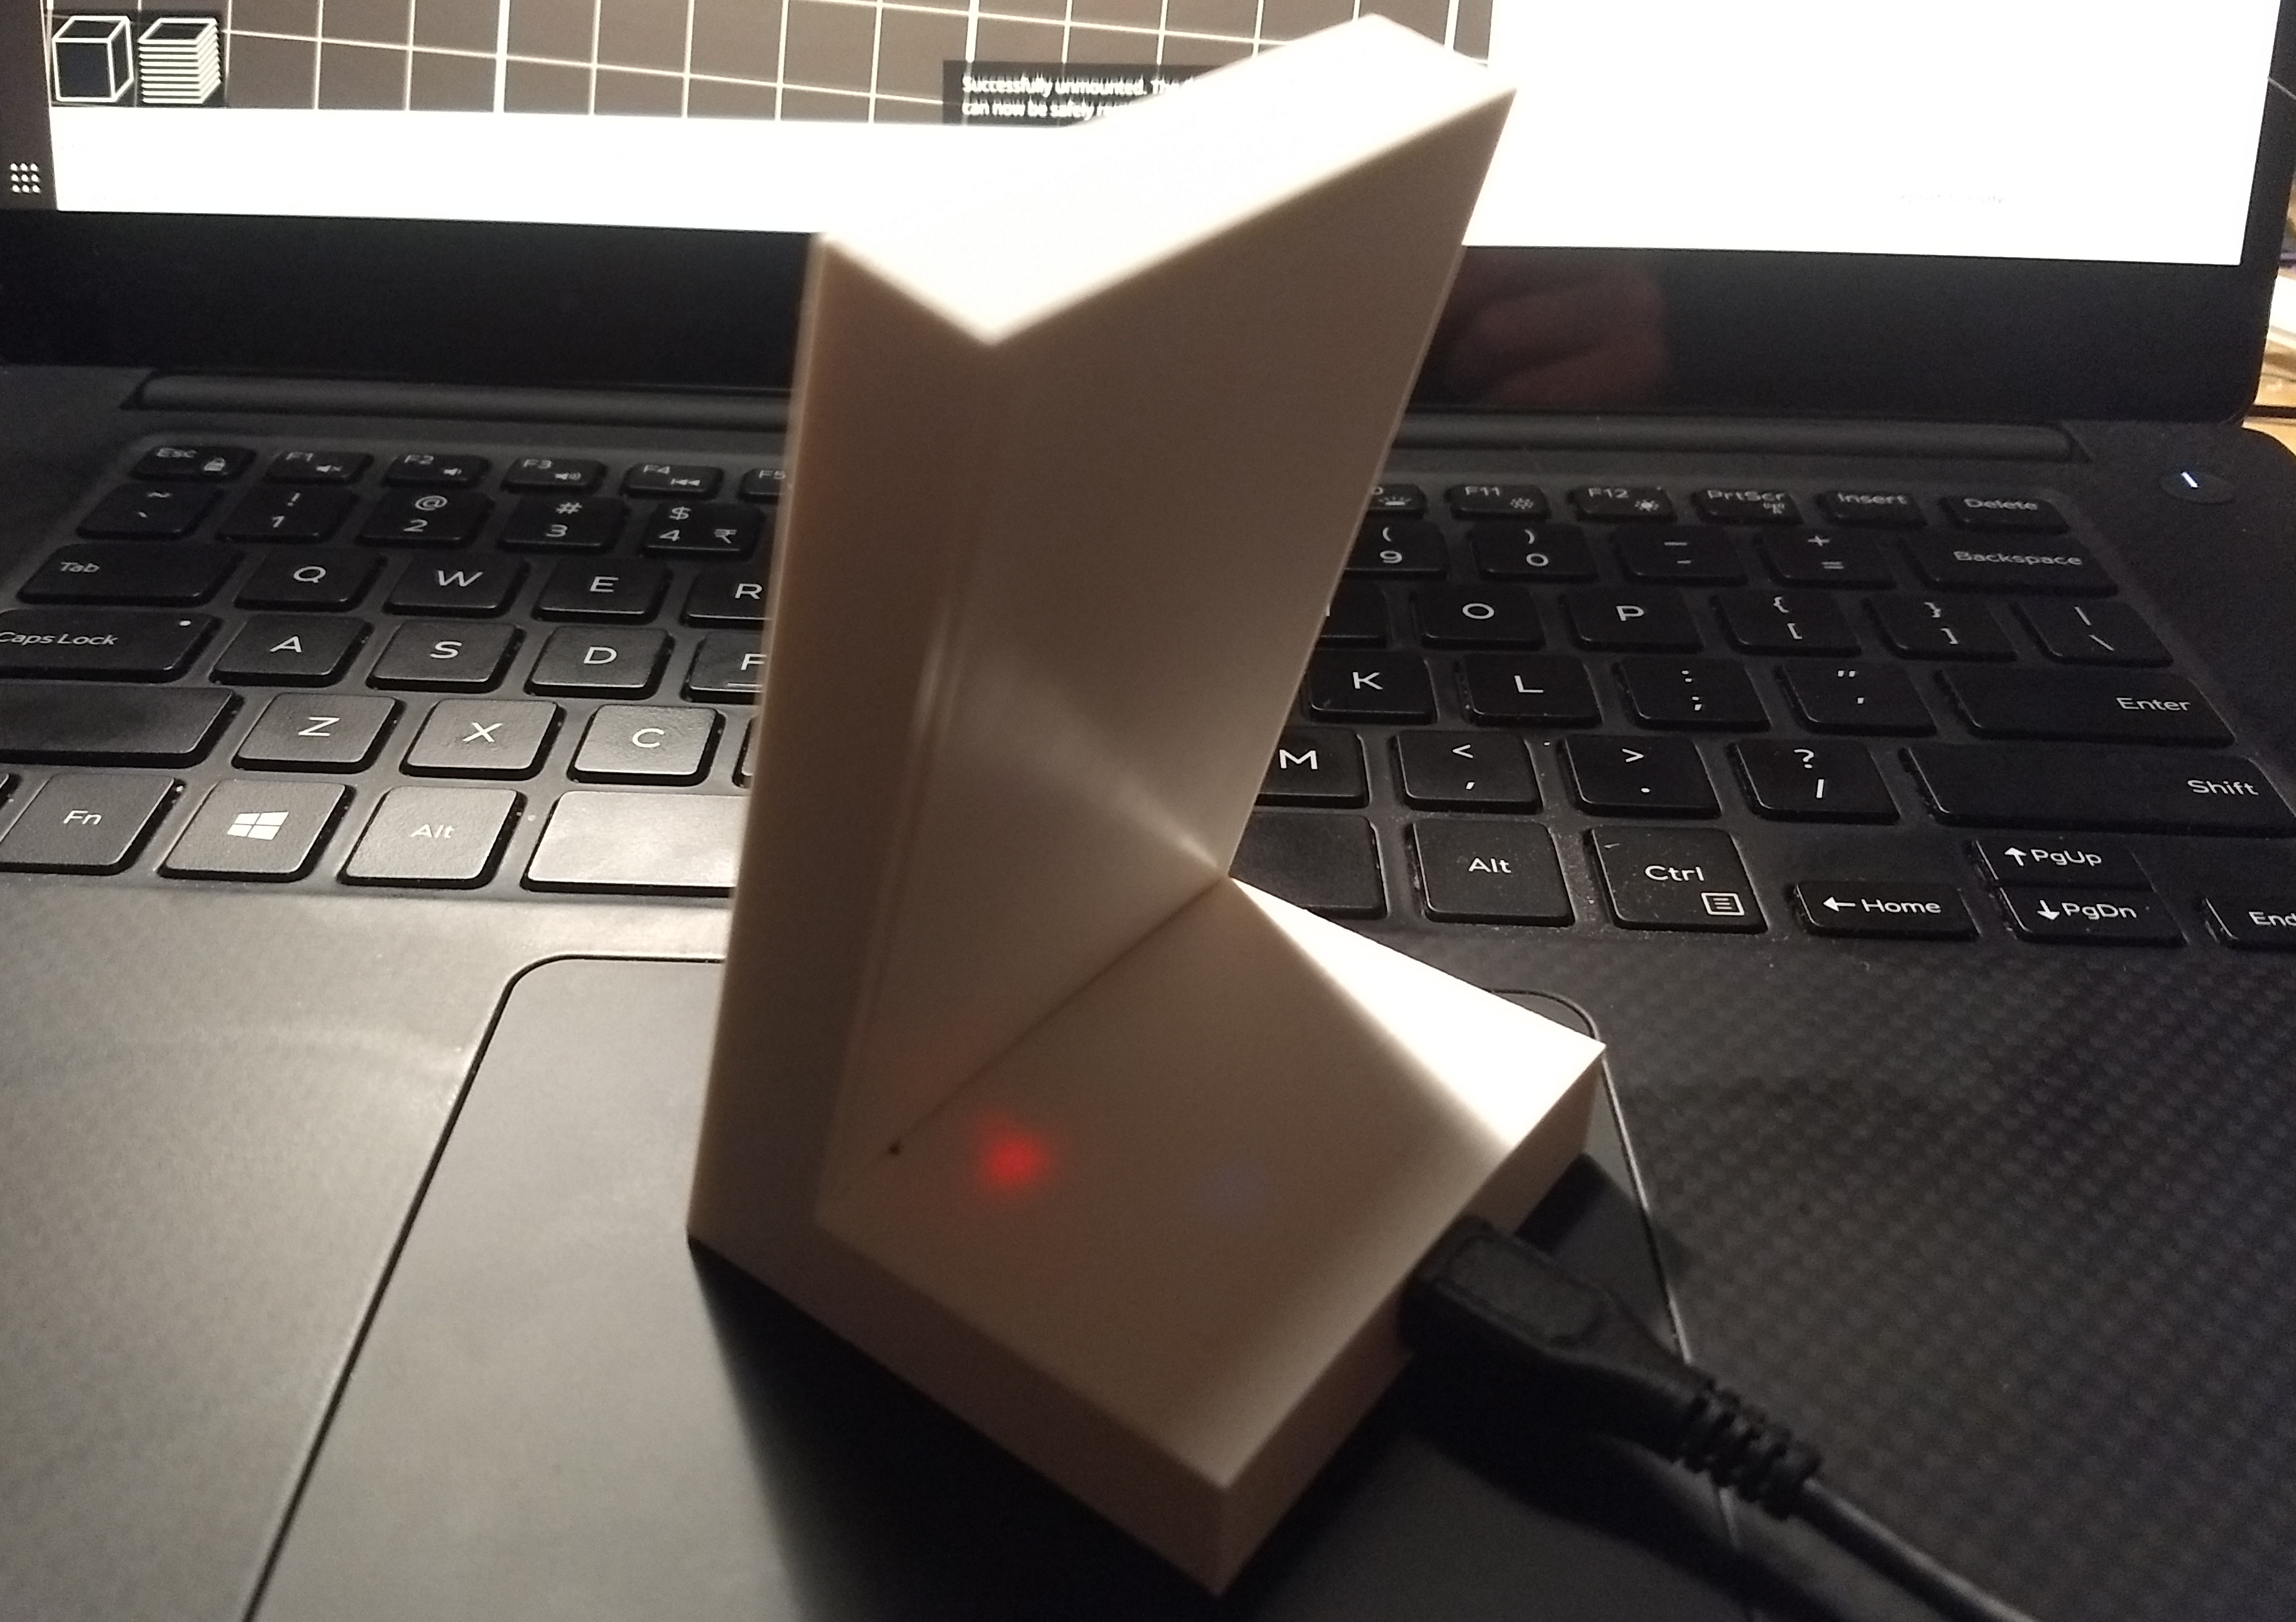
The 3D printed enclosure from the back
I used a TTGO Mini32 ESP32 board, since I didn't want to cheap out on processing resources. The enclosure had a support for the Wemos D1 mini however, so I had to use a knife and pliers to remove some plastic to fit the board.
I fixed the MINI32 board by using two small screws into two holes I pre-drilled into the enclosure using a screwdriver-style hand drill and a <2mm drill bit (well worth having that cheap tool in your toolbox!).
I soldered wire wrapping wires between the TFT and ESP32 boards, and fixed the ESP32 board in place. (The wires I used are a bit long considering 27Mhz SPI, but no issues seen)
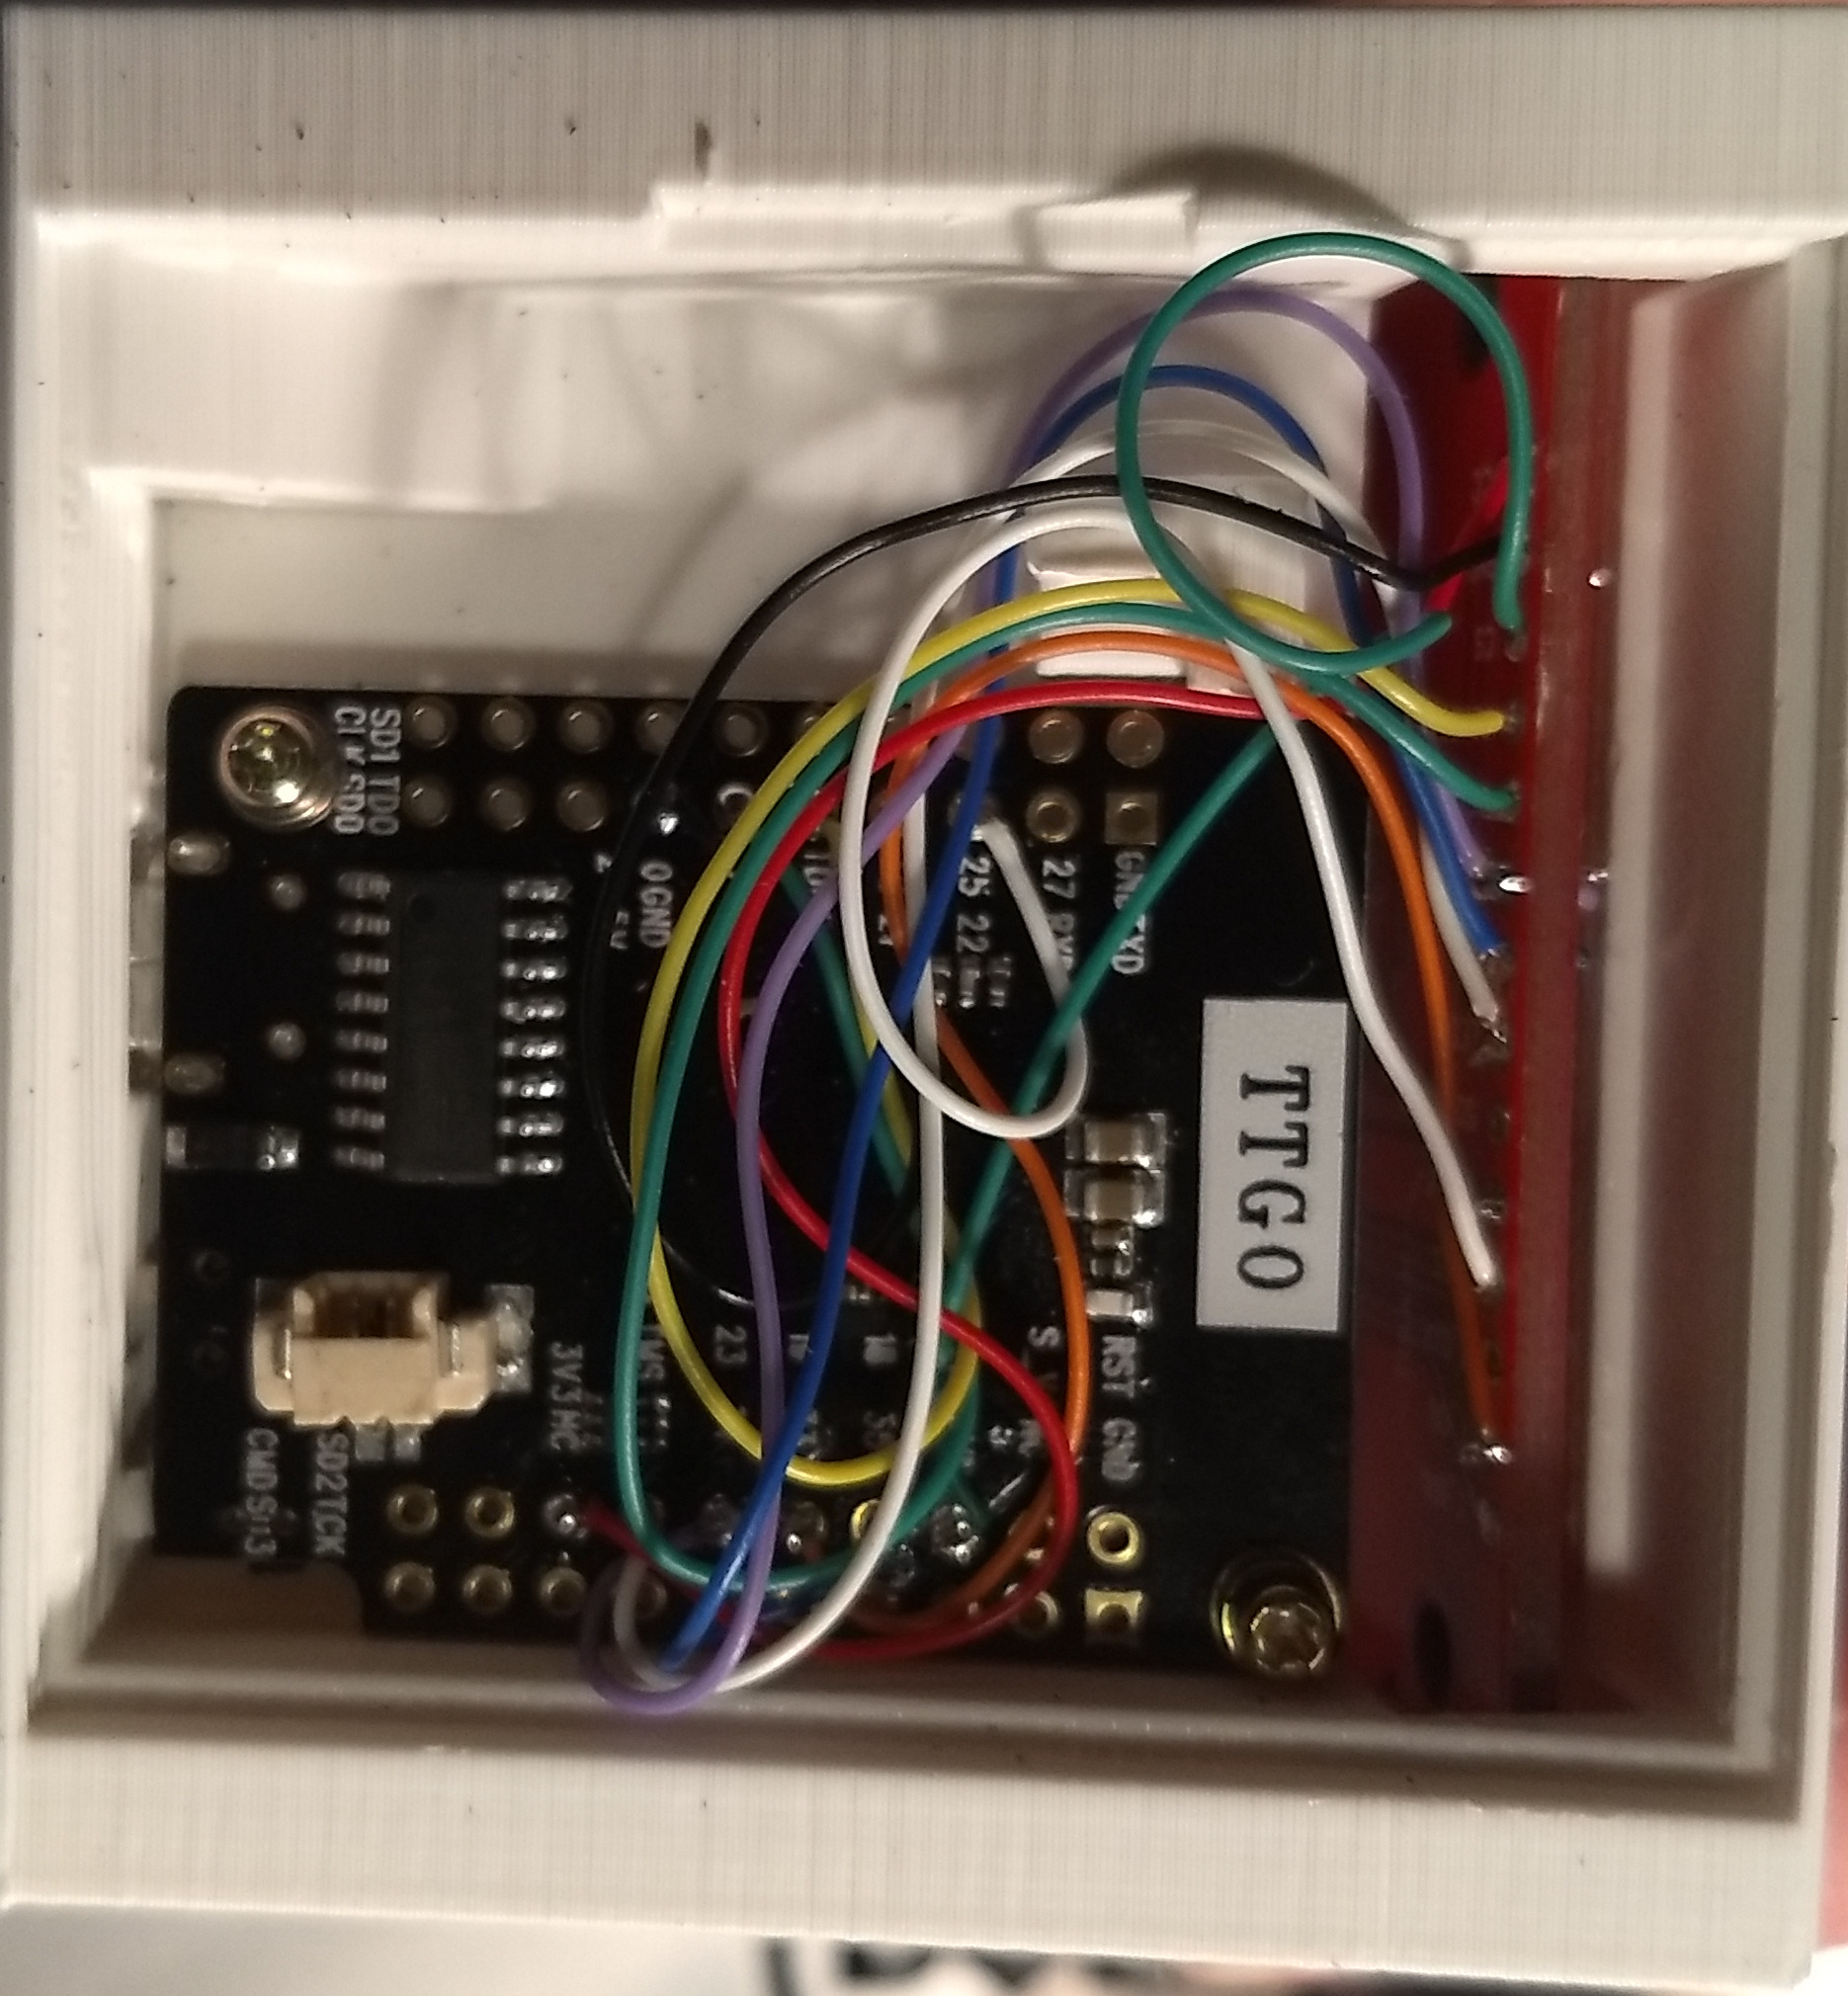
TTGO Mini32 wired to the screen
I hot-glued the display into place, making sure not to put any stress onto the resistive touch layer.
Software
Building a custom firmware
I followed the instructions to build openHASP, but used a modified platformio.ini:
[platformio]
extra_configs =
    thomas_secrets.ini
    user_setups/esp32/thomas.ini
Upload using
pio run -t upload --upload-port=/dev/ttyUSB0
The thomas_secrets.ini file contains predefinitions for my WIFI and MQTT setup. The custom user_setups ini file contains modifications to use the ILI9341 display with my own wiring:
[env:d1-mini-esp32_ili9341]
extends = esp32
board = wemos_d1_mini32

build_flags =
    ${env.build_flags}
    ${esp32.build_flags}
    -D HASP_MODEL="ESP32 D1 Mini"
    -D ILI9341_DRIVER=1
    -D USER_SETUP_LOADED=1
    ${touch.xpt2046}
    -D TFT_ROTATION=0 ; 0=0, 1=90, 2=180 or 3=270 degree
    -D TFT_WIDTH=240
    -D TFT_HEIGHT=320
    -D TFT_MISO=19 ;// (leave TFT SDO disconnected if other SPI devices share MISO)
    -D TFT_MOSI=23
    -D TFT_SCLK=18
    -D TFT_CS=26  ;// Chip select control pin
    -D TFT_DC=16  ;// Data Command control pin
    -D TFT_RST=17 ;// Reset pin (could connect to RST pin)
    -D TFT_BCKL=5  ;None, configurable via web UI (e.g. 2 for D4)
    -D SUPPORT_TRANSACTIONS
    -D TOUCH_CS=22
    -D TOUCH_DRIVER=2046 ; XPT2606 Resistive touch panel driver
    -D SPI_FREQUENCY=27000000
    -D SPI_TOUCH_FREQUENCY=2500000
    -D SPI_READ_FREQUENCY=16000000
;endregion
;endregion

;region -- Library options -------------------------------
lib_deps =
    ${env.lib_deps}
    ${esp32.lib_deps}

lib_ignore =
    ${env.lib_ignore}
    ${esp32.lib_ignore}
;endregion
It was certainly not rocket science to make these adjustments, luckily the openHASP developers were very helpful with the more daunting questions I had when bringing up this project without reading all the documentation.
Hello world
openHASP supports most LVGL widgets I played with when getting to know LVGL during my Mood Control project. I picked the example 'Dash UI page` from the documentation to play with once board bring-up was finished and WiFi and my MQTT server were connected.
It's easy to interact with the display over MQTT.
I used these mosquitto commands to modify the display's widget state:
To update the temperature arc 'dial' to 20 degrees:
mosquitto_pub -h hass -u $MQTT_USER -P $MQTT_PASS -t hasp/plate_c45378/command/p1b2.value -m "20"
To update the humidity arc indicator text to 90%
mosquitto_pub -h hass -u $MQTT_USER -P $MQTT_PASS -t hasp/plate_c45378/command/p1b3.value_str -m "90%"
Making it useful
I intend to use this build as a replacement-on-steroids for my IKEA hockey puck control that I use with home assistant, but that's for another day.
Shout-out
A big thank-you to the people creating HASP and openHASP, the 3D design and all free-software home automation projects!
Liked something? Worked on something similar? Let me know what you think on Mastodon!
You can use your Mastodon account to reply to this post.