Using your WRT54 to secure your email connections
Fetching POP3 mail over an untrusted WiFi public access point is dangerous, as the password is transmitted unencrypted (in plain text). Anyone with a laptop and a suited program can sniff your password right out of the air, along with your email. Sending mails is also impossible most of the time, since most ISP's only relay mail from computers directly connected to their network.
These two problems are solved by fetching and sending your email via an encrypted connection between your laptop and Internet gateway at home. If you run Linux and have a WRT54G, and it's running OpenWRT, you're almost there. Just follow this guide and you'll be set in under half an hour.
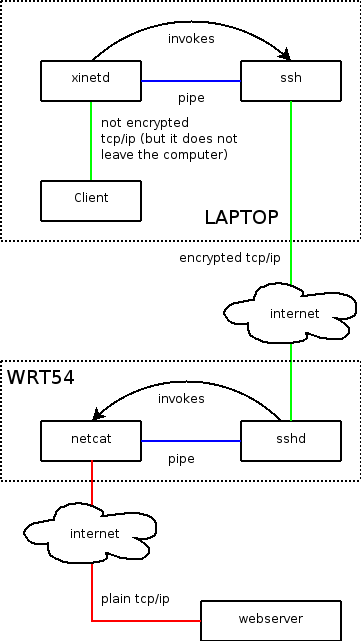
How it works
Setting up a DYNDNS account
Follow the PublishYourWANIp article from the OpenWRT wiki for this.
Install Openssh on the WRT54g
Issue the following commands:
ipkg remove dropbear
ipkg install openssh-server
ipkg install openssh-client
It is not necessary to install the openssh-client package if you do not wish to use the scp command to transfer a file later on in this howto.
Add the following lines to /etc/sshd/sshd_config:
Protocol 2
HostKey /etc/ssh/ssh_host_rsa_key
HostKey /etc/ssh/ssh_host_dsa_key
RSAAuthentication yes
AuthorizedKeysFile      /etc/ssh/authorized_keys
Issue the following commands:
touch /etc/ssh/authorized_keys
/etc/init.d/S50ssh start
The sshd init script will now create a key for the WRT54, this takes a while, let it do it's job, Keep the ssh connection open to the box. and lets switch back to your laptop.
Preparing xinetd
On your laptop now, issue the following commands:
emerge xinetd
rc-update add xinetd default
For each tunnel, add the following text to a new file called /etc/xinetd/tunnels, change the following things:
- TUNNELNAME
- The name of the tunnel (substitute in the service and server_args line!)
- REMOTEHOST
- Your WRT54's dynamic DNS hostname (eg; killerbunny.dyndns.org)
- PORTNUMBER
- The port you want this tunnel to listen to at the local host.
service TUNNELNAME
{
        type            = UNLISTED
        disable         = no
        socket_type     = stream
        protocol        = tcp
        wait            = no
        user            = root
        server          = /usr/bin/ssh
        server_args     = -q -T -i /etc/tunnels/TUNNELNAME root@REMOTEHOST
        port            = PORTNUMBER
        groups          = yes
        bind            = 127.0.0.1
}
Now, restart xinetd.
Create a ssh key for for each tunnel
Create a directory in /etc to hold the ssh keys and create an empty file /tmp/authorized_keys:
mkdir /etc/tunnels
echo -n >/tmp/authorized_keys
Now execute the following two commands for each tunnel, this will create a key pair for each tunnel, and cat the public key to the authorized_keys file, substitute the following words in the command:
- TUNNELNAME: The name of the tunnel
- TARGET: The target of the tunnel (eg; mail.myprovider.com)
- PORT: The target port of the tunnel (eg; 25 for SMTP or 110 for POP3)
Press ENTER when asked for a passphrase (this is important!).
ssh-keygen -t dsa -f /etc/tunnels/TUNNELNAME
echo "command=\"nc TARGET PORT \",no-X11-forwarding,no-agent-forwarding,\
no-port-forwarding `cat /etc/tunnels/TUNNELNAME.pub`">>/tmp/authorized_keys
Now transfer the /tmp/authorized_keys file to your WRT54 (substitute REMOTEHOST by your Wrt54's IP or hostname):
scp /tmp/authorized_keys root@REMOTEHOST:/etc/ssh/authorized_keys
Prepare for reboot
By now the keys are probably generated. The OpenSSH daemon will not be running probably, this is because the dropbear sshd is still running.
Check if you can enter the box using OpenSSH. On the server run /usr/sbin/sshd -p 2200, and try to connect to it using ssh -p 2200 root@IP.
If this works, you're sure the daemon will start after reboot, so, reboot the box.
Configuring the mail client
Your mail client has to fetch mail now at the localhost instead of your provider's server. The xinetd daemon will then create the tunnel to your WRT54 on the fly, and the WRT54 will connect to the server depending on the key used to create the tunnel.
Troubleshooting
You can check if the tunnel is created without asking for a password with the following command:
ssh -q -T -i /etc/tunnels/TUNNELNAME root@REMOTEHOST
If you are asked for a password, you probably didn't press enter when you were asked for a passphrase.
Liked something? Worked on something similar? Let me know what you think on Mastodon!
You can direct-message me, or mention me @thouters@hsnl.social