Modbus Current Clamps for your breaker box
Introduction
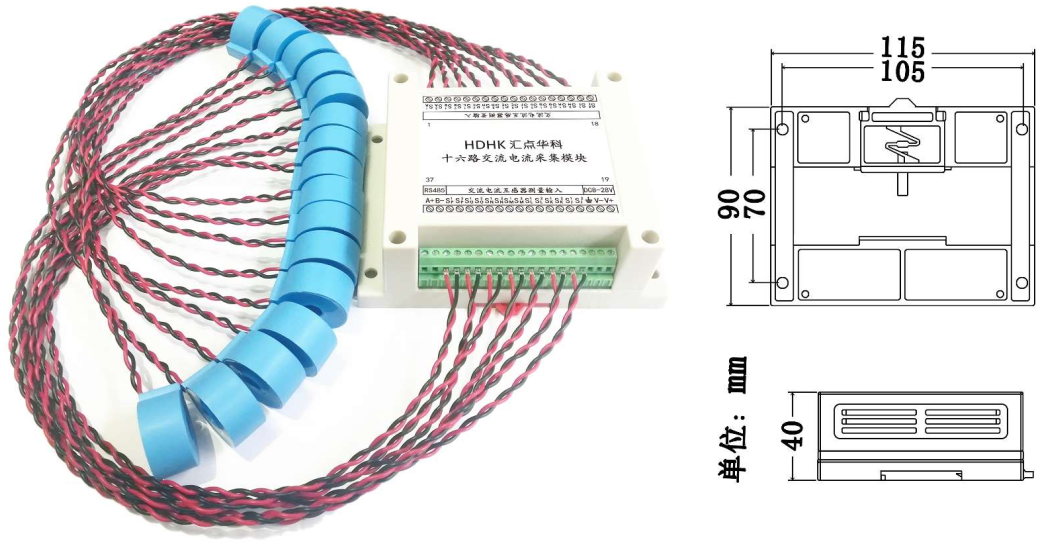
Modbus current measurement device
To feed my power optimization obsession, I already built some strange devices and did some interesting experiments.
With a new electricity panel in place, I really needed to add current monitoring to 16 of the circuits to keep an eye on things.
I like Modbus for wired sensors for its simplicity, and found this reasonably priced device that seemed to be a good solution.
The HDXXAXXA16GK-D has 16 screw terminal inputs to connect the current transformers that it ships with. It takes 8-28VDC power supply and has the usual A/B RS485 Modbus-RTU connections.
Concept
Home Assistant can track the energy consumption in your house, but it needs sensors to do so. In Belgium, the obvious way to start is to tap in to the grid utility meter, which has a P1 port, this is a serial port that dumps the meter data every 5 seconds or so.
Your solar production can be tracked by reading the inverter data, either via Modbus or via an API, in my setup, the solaredge inverter is read via the Solaredge Modbus integration over TCP/IP.
If you want to add accurate tracking of individual devices, a nice and easy way is to use a smartplug, which is low entry and easy to install. But if you want to track the power consumption of your entire house, it may be safer to use current clamps on the main circuits in your electrical panel. This way you can avoid depending on the electrical reliability of the smartplugs, especially for high power devices like electrical boilers or heaters.
Installing actual energy meters per circuit would be more accurate, but
- are very expensive
- they would take up a lot of space.
- are harder to retrofit.
I opted to use proper modbus energy meters for the heatpumps and EVSE (car charge point) though, since I want proper tracking for them, and energy meters take power factor into account and have a better sampling rate.
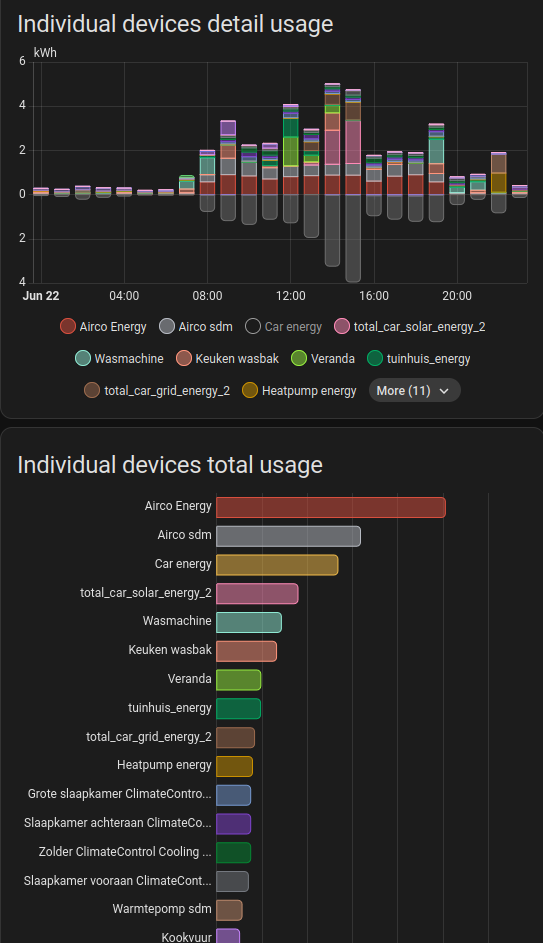
Colorful Home Assistant energy graphs
Since we are interested in power and energy, and the current clamps only measure current, we need to do some calculations in home assistant. We can use the P1 grid meter's reported line voltages and combine the data in home assistant template sensors.
Configuring the device
I always trial-run a modbus device on desk with a USB to RS485 adapter before installing it in the panel.
For starters, we need to assign the device a unique Modbus address using modbus-cli (and perhaps run pip install modbus_cli first) since the device is connected together with several other modbus devices on the same RS485 bus.
To set the slave address to 4:
modbus /dev/ttyUSB0 -p 2 -b 9600 -P n -s 1 3=4
You can also try to read some of the registers to see if the device is working. To read the version register:
modbus /dev/ttyUSB0 -p 2 -b 9600 -P n -s 4 0
Installing the device
The device is installed in the electrical panel, powered by a 24VDC power supply, and connected to the RS485 bus. The 16 supplied current clamps are connected to the 16 channels, and clamped around the live wire of each circuit. The device can be mounted on a DIN rail, but it's quite big to fit the cabinet that I have, so i used the flanges on the side to screw it to the backplate of the cabinet.
Warning
Make sure to turn off the power in the electrical panel before working in it, and if you are not comfortable doing so, hire a professional electrician. Working in an electrical panel can be dangerous and even deadly. Always follow local regulations and guidelines. I am not responsible for any damage or injury caused by actions taken based on this information. This is not a step-by-step guide, just a description of what I did. Your situation may be different, so adapt accordingly. Always prioritize safety and compliance with local laws. If in doubt, consult a professional electrician.
Warning
The current clamps are transformers, and the secondary side should never be open-circuited while current is flowing in the primary side. This can cause high voltages and damage the device or cause injury. Always turn off the circuit in question before connecting the clamp's measurement output wires to the meter.
Home assistant configuration
To keep the configuration concise, I used only two yaml entries, one for the version register (as a sanity check), and another one with a slave_count of 16 to read all the channels in one go. Home assistant can then even use a single modbus command, to speed things up.
These are the additions to modbus.yaml:
- name: clamps_version
  slave: 4
  address: 0
  data_type: uint16
- name: clamps_channel
  unique_id: clamps_channel
  slave: 4
  #off by one so channel_1 is actually channel one
  address: 7
  precision: 2
  scale: 0.01
  data_type: uint16
  device_class: current
  unit_of_measurement: A
  slave_count: 16
In template.yaml a template entity is created to calculate the power consumption of the circuit:
- trigger:
  - platform: time_pattern
    minutes: "/1"
  - platform: state
    entity_id:
      - sensor.clamps_channel_1
      - sensor.sdm630_phase_1_line_to_neutral_volts
    not_from:
      - "unknown"
      - "unavailable"
    not_to:
      - "unknown"
      - "unavailable"
  sensor:
     - name: car_clamp_power
        unique_id: car_clamp_power
        unit_of_measurement: W
        device_class: power
        state_class: measurement
        state: >
        {% set current = states('sensor.clamps_channel_1')|float %}
        {% set voltage = states('sensor.sdm630_phase_1_line_to_neutral_volts')|float %}
        {% set power = current*voltage*3 %}
        {{ '%0.3f' | format(power) }}
        attributes:
        dummy: "{{ now().minute }}"
And in sensor.yaml an energy meter that integrates the power of the circuit over time:
- platform: integration
  name: car_clamp_energy
  source: sensor.car_clamp_power
  round: 2
Visualisation of power use in Home Assistant
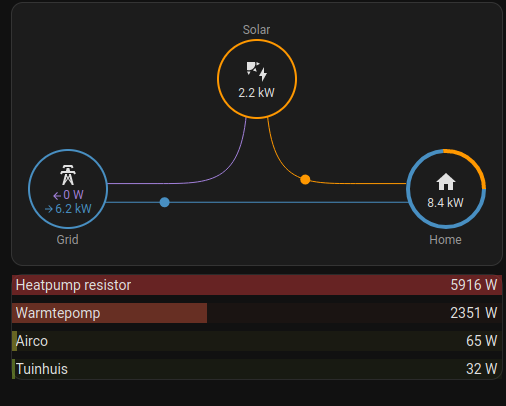
Home assistant power visualisation using bar-card and custom template card.
Home assistant has built-in energy tracking and visualisation, but no overview of the power use.
To have such a nice live visualisation, I set up a home assistant dashboard that displays the real time power usage. This dashboard uses the config-template-card with bar-card and the power-flow-card-plus.
I use the following YAML configuration entered in the dashboard editor since this custom card can not be configured via custom UI dialog.
type: custom:config-template-card
variables:
  - entity: sensor.warmtepomp_int_power
    name: Heatpump resistor
  - entity: sensor.car_grid_power_2
    name: Laadpaal grid
  - entity: sensor.car_solar_power_2
    name: Laadpaal solar
  - entity: sensor.tuinhuis_power
    name: Tuinhuis
  - entity: sensor.nikoplug_power
    name: Ventilatie
  - entity: sensor.badkamer_chauffage_power
    name: Badkamer
  - entity: sensor.kitchen_1_power
    name: Keuken ww
  - entity: sensor.droogkast_power
    name: Droogkast
  - entity: sensor.wasmachine_power
    name: Wasmachine
  - entity: sensor.fornuis_power
    name: Fornuis
  - entity: sensor.kitchen_2_power
    name: Keuken links
  - entity: sensor.oven_power
    name: Oven
  - entity: sensor.sdm120_1_power
    name: Warmtepomp
  - entity: sensor.sdm120_2_power
    name: Airco
  - entity: sensor.veranda_power
    name: Veranda
entities:
  - sensor.airco_power
  - sensor.warmtepomp_int_power
  - sensor.boiler_power
  - sensor.tuinhuis_power
  - sensor.car_solar_power_2
  - sensor.car_grid_power_2
  - sensor.nikoplug_power
  - sensor.badkamer_chauffage_power
  - sensor.kitchen_1_power
  - sensor.droogkast_power
  - sensor.wasmachine_power
  - sensor.fornuis_power
  - sensor.kitchen_2_power
  - sensor.oven_power
element:
  type: custom:bar-card
  entities: |-
    ${ vars.filter(v => {
      let ent = states[v.entity];
      if(ent === undefined || ent.state === undefined) {
        console.warn(`Power meter: Entity ${v.entity} not found`);
      }
      else if(ent.state === 'unknown') {
        console.warn(`Power meter: Entity ${v.entity} state is unknown`);
      }
      else if(isNaN(ent.state)) {
        console.warn(`Power meter: Entity ${v.entity} state is not a number`);
      }
      else return Number(ent.state) > 5 || true;
    }).sort((v1,v2) => states[v2.entity].state - states[v1.entity].state)}
  direction: right
  entity_row: true
  min: 0
  max: >-
    ${ Math.max(...vars.map(v => states[v.entity]).filter(e => !!e).map(e =>
    e.state).filter(n => !isNaN(n))) }
  height: 20px
  stack: vertical
  decimal: 0
  icon: mdi:flash
  positions:
    icon: "off"
    indicator: outside
    name: inside
    value: inside
  severity:
    - color: "#a1a1a18a"
      from: 0
      to: 2
    - color: "#3ea8328a"
      from: 2
      to: 10
    - color: "#85a8328a"
      from: 10
      to: 50
    - color: "#a8a4328a"
      from: 50
      to: 200
    - color: "#a887328a"
      from: 200
      to: 500
    - color: "#a867328a"
      from: 500
      to: 1000
    - color: "#a846328a"
      from: 1000
      to: 3000
    - color: "#a832328a"
      from: 3000
      to: 10000
  style: "#states > * {\n  margin: 1px;\n}\nbar-card-name,\nbar-card-value {\n  font-size: 0.9rem;\n  color: #ffffffaa;\n  font-weight: bold;\n}\nbar-card-value\t{\n  font-weight: bolder;\n}\nbar-card-indicator {\n  margin-top: 4px;\n  transform: scaleY(-1);\n}"
Liked something? Worked on something similar? Let me know what you think on Mastodon!
You can use your Mastodon account to reply to this post.