Solar Matched Electric Heating
A heater power-controlled to consume all excess solar production!
I built a prototype test setup that makes sure every Watt produced by our solar panels is used by an electric heater. It uses an industrial power controller and some code to match the heater's power usage to whatever power is not used by the house.
This would make it possible to maximize our solar self consumption, which is required to get a decent return on your solar investment.
For us, injecting to the electricity grid is giving away power, we have to pay about 15x as much compared to what the utility pays us for returning energy to the grid.
High level overview
Pending renovation works adding a heat pump, our heating is still handled by existing electric convection heaters. The thermostat runs these at a full power of 5kW which poorly matches the solar production on a winter day where we might get a average 1 to 2 kW but produce enough energy in total to keep the house warm.
Note: As of 2024 we heat using a heatpump!
Block diagram
We have a 'DSMR' digital utility meter that reports the grid consumption and injection every few seconds over a serial line. I integrated it into home assistant, which allows its data to be observed in the energy and history dashboards, and to be used in automations.
The meter calculates the net power in and out per AC (sine) cycle, so using a solid state relay to duty cycle the heater is not an option, we need a power controller that will create an exact average load every 50Hz cycle.
I previously bought a Siemens Logo logic controller with analog output module and a lighting dimmer I can control with it.
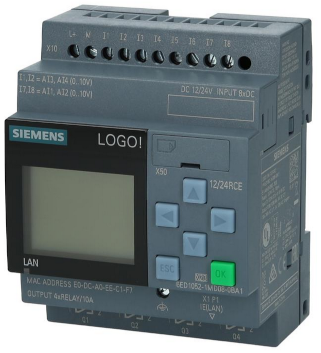
Siemens logo logic controller
I already prototyped controlling the Logo's analog output from Home Assistant using Modbus over TCP, and realized I could re-use this setup and replace the dimmer with an industrial power controller performing phase angle power control.
Note: the open energy monitor project has good documentation on what they call PV Energy Diversion, they describe an implementation using a microcontroller.
Electrics
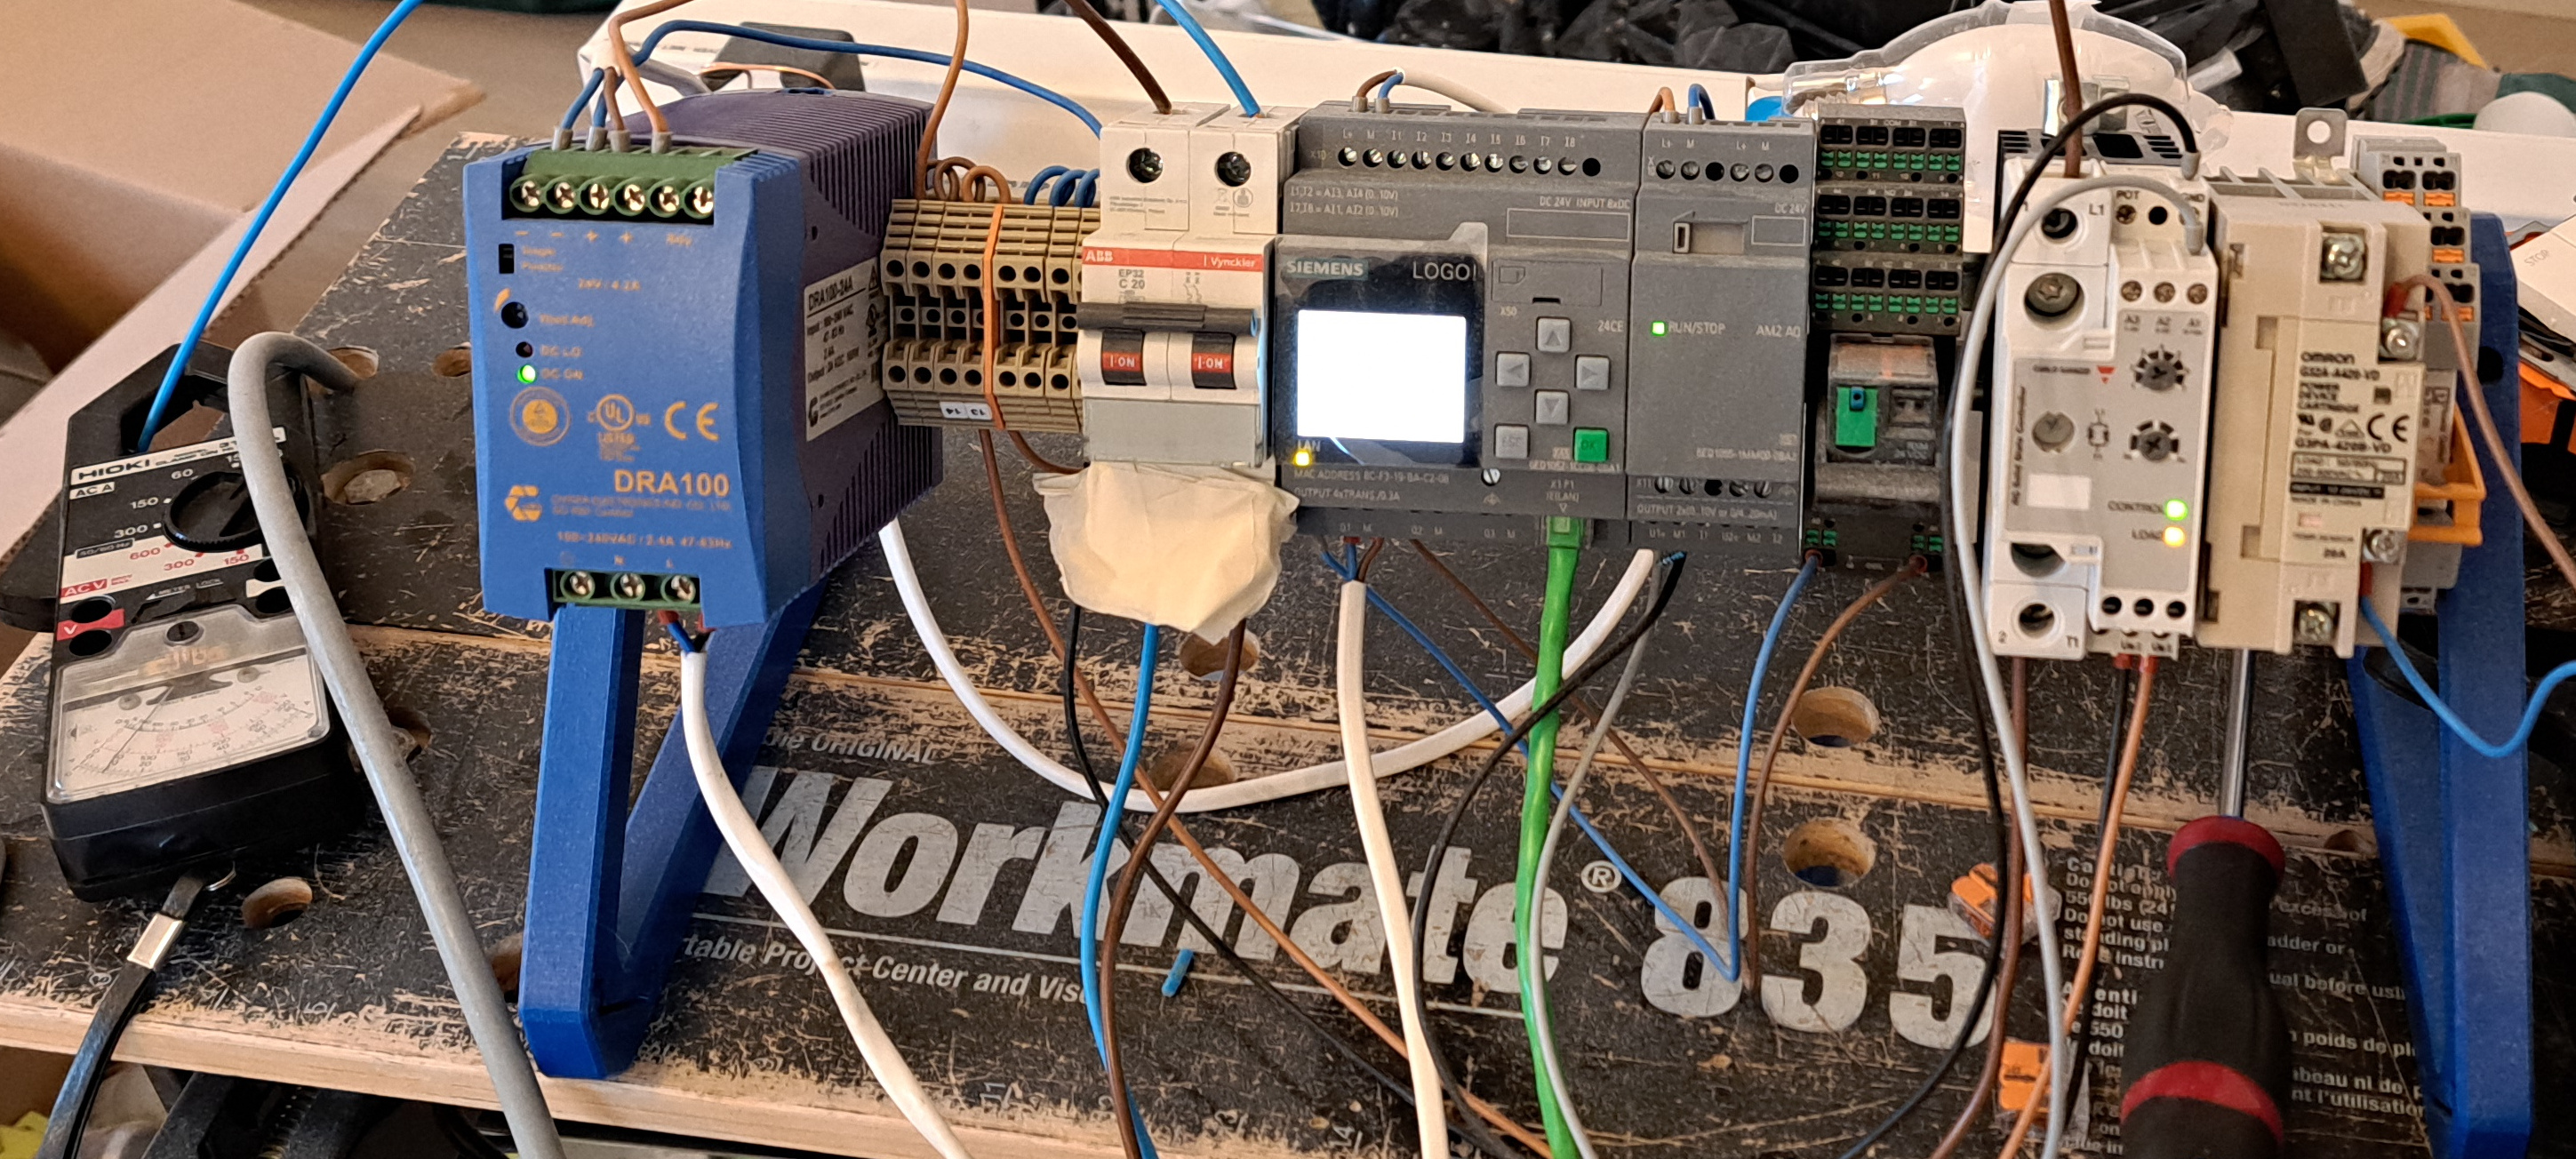
Test setup (convection heater not visible)
Power controller
I bought a 'RGC1P23V30ED Solid State Contactor, 85-265Vac, 30A Carlo GAVAZZI'. This device can perform phase angle power control by firing its SCR at a certain angle of each AC sine wave. This is the way classic filament lights are dimmed. I think it's reasonably priced at 138€ for industrial gear.
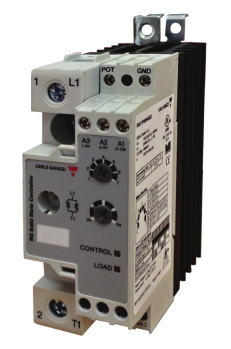
Carlo GAVAZZI power controller
The power controller has an analog voltage input as control signal.
Siemens Logo AQ and Home assistant
The simplest way to interface the logo with home assistant is by enabling a modbus server in the Logo.
After doing so, the modbus register map can be accessed given an off-by-one is respected :-).
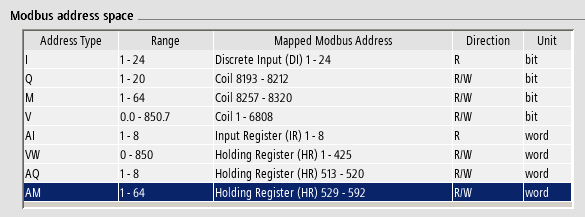
Modbus Address space
Logo sketch
The Logo runs a simple sketch that will continuously set its analog output (AQ) to the value of an analog variable (AM)
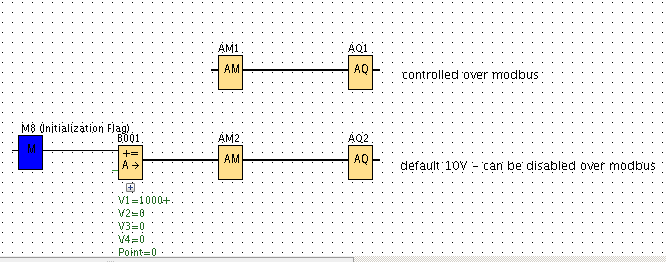
Logo sketch
Modbus Hub configuration
You need to configure the modbus device in the configuration.yaml's modbus section.
- name: "logo1"
  delay: 5
  timeout: 5
  type: tcp
  host: "192.168.2.28"
  port: 502
Input Number
To set the heater power, I created an 'input number' which triggers an automation to perform a modbus write. I set the scale to the heater's maximum output power, and the unit to Watts so this can be plotted nicely.
Note that this is not the actual power. Since we have a feedback loop in the automation below, all solar production will be consumed but this value will not be exactly the heater power since it's not a measurement.
heatdump_level_variable:
  name: heatdump level
  initial: 0
  min: 0
  max: 2000
  step: 1
  unit_of_measurement: W
Automation
After setting up this automation, changing the input number slider will change the Logo's analog output.
- alias: modbusupdate
  description: "Push input_number value to modbus register"
  trigger:
    - platform: state
      entity_id: input_number.heatdump_level_variable
  condition: []
  action:
    - service: modbus.write_register
      data:
        hub: logo1
        unit: 1
        address: 528
        value: "{{ int(states('input_number.heatdump_level_variable')|int * 1000/2000) }}"
Power optimizer
I'm very fed up with YAML automations in home assistant. I tried pyscript which is very promising, but this time I wanted to give appdaemon a try.
I created this simple automation which has an obvious issue: that the power consumption and production values from a DSMR telegram are fed sequentially to the power_update() callback via state update events, which will cause it to produce an output based on old and new data, resulting in bad output.
During my (short) testing I did not observe any weird behavior caused by this. I just simply coded it and it started doing its thing!
class HelloWorld(hass.Hass):
    """ Note: All units are watts """
    consumption = Decimal("0")
    production = Decimal("0")
    heater_max_power = Decimal("2000")
    heater_min_power = Decimal("10")
    current_heater_power = 0
    def initialize(self):
        self.listen_state(self.on_measurement_update, "sensor.electricity_meter_power_consumption")
        self.listen_state(self.on_measurement_update, "sensor.electricity_meter_power_production")

    def set_heater_power(self, watt_value):
        """ Calculate and set the available heater power needed """
        watt_value_clipped = min(watt_value, self.heater_max_power)
        self.set_heater(watt_value_clipped)

    def set_heater(self, value):
        self.set_value("input_number.heatdump_level_variable", value)

    def calculate_next_heater_power(self, grid_power, old_heater_power):
        """ grid power: negative is consumption """
        # don't let the value go negative
        heater_power = max(0,grid_power + old_heater_power)
        if heater_power >= self.heater_min_power:
            return heater_power
        return 0

    def on_measurement_update(self, entity, attribute, old, new, cb_args):
        self.log(f"{entity}: {new}")
        # A very hackish way to add consumption and production :-(
        if "production" in entity:
            self.production = Decimal(new)*1000
        if "consumption" in entity:
            self.consumption = Decimal(new)*1000
        grid_power = self.production - self.consumption
        self.log(f"power is {grid_power} ")
        heater_power = self.calculate_next_heater_power(grid_power, self.current_heater_power)
        self.current_heater_power = heater_power
        self.set_heater_power(heater_power)
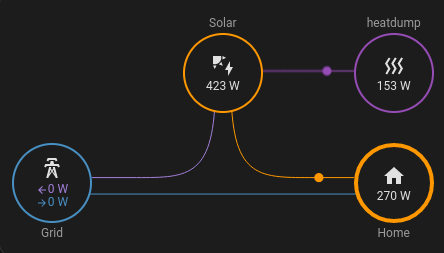
Trial run
I took a screenshot of the operating values during the experiment since it's the only way to 'demo' this. A few notes on this graph:
- I was doing live changes to the system at the time, so there are gaps and spikes.
- The big blocks of grid consumption can be explained by the house's electrical convection heaters running to heat the house.
- The 'heatdump level' needs to be multiplied by two, it was not actually in Watts, but per-mille at this point in time(the range of the analog out).
- The net grid usage apeared pretty stable at 0W at this point, the meter's kWh readings also stayed constant.
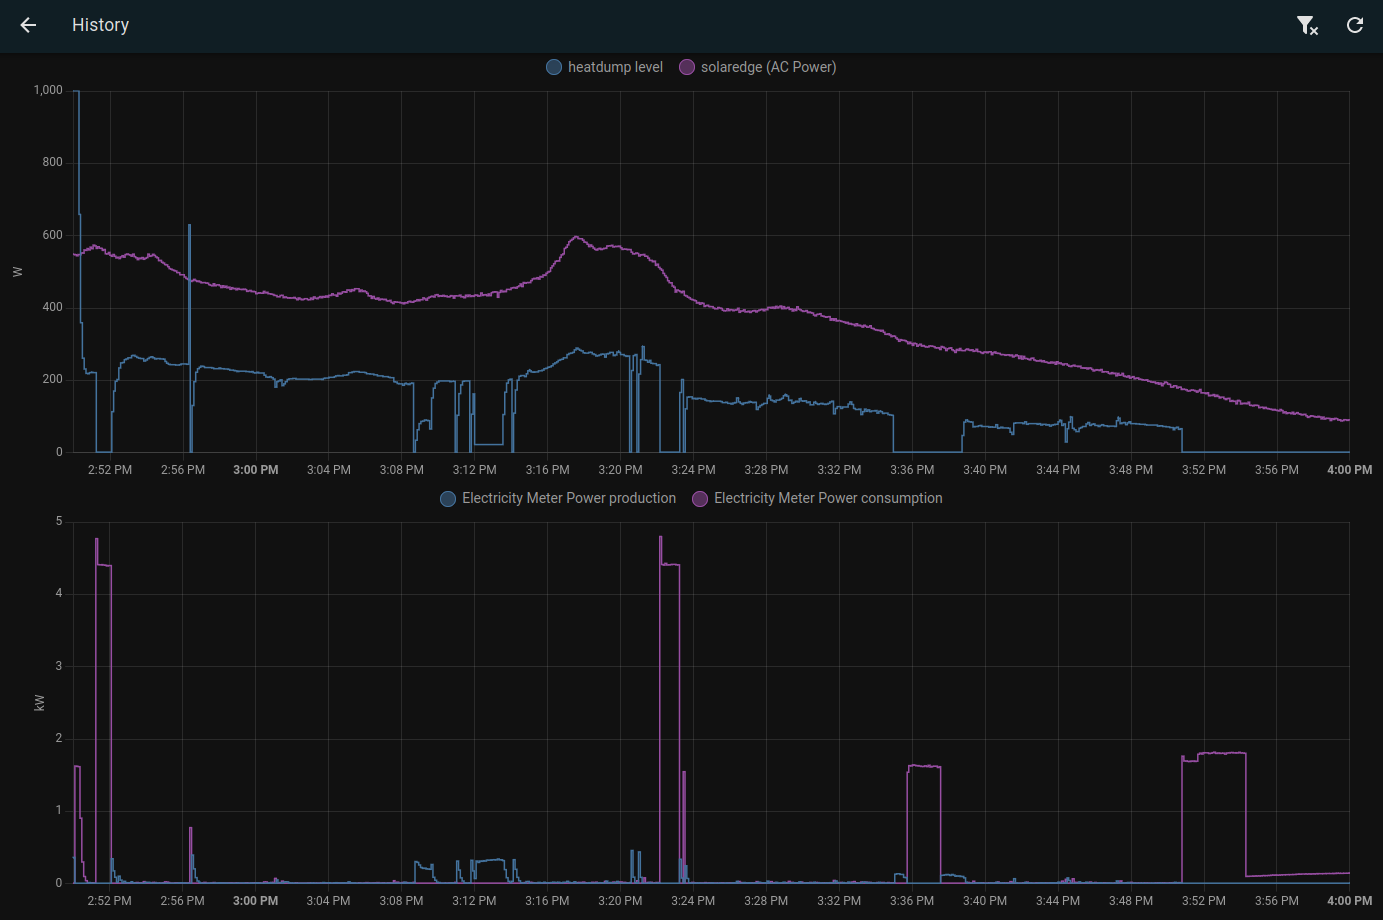
History data during the experiment
Final thoughts on all of this
Integration into an existing heating system
To fit this into an existing heating system, a circuit like this could be used:
Conceptual schematic
Here an existing thermostat would ensure a minimum ambient temperature, while a new one (possibly the cooling output of the thermostat) would cut the control signal to the heater to prevent things getting to hot on sunny days.
The second analog out is used to provide a 'full power' signal to the power controller.
If you want to create a fully continuous heating system, you can feed an analog value to this analog output and have it sent to the power controller by setting the first thermostat setpoint very high.
Cost considerations
The Siemens components cost me about 250€ which is quite expensive but actual professional equipment (it will be used as home automation controller for the simple reliable things).
There are probably cheaper Digital-to-analog options possible that can be combined with an ESPHome or raspberry pi to reduce cost. I bought a cheap off the shelve PWM to 0-10V module I'm going to experiment with.
The RGC1P23V30ED power controller cost 138€. I looked at other power controllers, but the RGC1P23V30ED looked like the most reliable and best bang for the buck.
The required netfilter to minimize electro-magnetic interference also costs 110€. Which brings the minimal BOM 250€. The filter also has a current draw of 7W continuously. The power controller and filter also require a separate electricity cabinet that is deeper than the normal Belgian breaker boxes, likely a metal one that can heatsink the filter and power controller at the same time.
Don't forget to include a suitable fuse to protect the power controller, the power controller datasheet provides specifications for this.
Cost-benefit
If you have a gas heating system and have the same energy provider as I do, the return on injecting a kWh to the grid is the same as the cost of a kWh gas, I'm not sure what the additional taxes or distribution costs are for gas, but if there are any additional costs, you would be better off running an electric heater with it on cold days.
For every kWh I immediately use to heat the house, I save over 0.28€. So imagine a total setup cost of 300€ (I added 50€ there for a small metal enclosure and esphome to generate 0-10V), this thing would need to burn 1.2MWh of solar to break even. I don't know how much solar production we will get in the first half of the year, so can't estimate how soon the hardware would pay itself back.
Anyway, any situation will differ, so if you consider a similar aproach, enjoy the napkin math 🧐.
Liked something? Worked on something similar? Let me know what you think on Mastodon!
You can use your Mastodon account to reply to this post.